Found this on a post on Facebook and thought it needed to be posted everywhere I am able. I am a Christian...I have a ways to go to be living like this, but I pray the Holy Spirit will continue to transform me. I love this...
I'm part of the fellowship of the unashamed. I have Holy Spirit power. The dye has been cast. I have stepped over the line. The decision has been made. I'm a disciple of His. I won't look back, let up, slow down, back away, ...or be still.
My past is redeemed, my present makes sense, my future is secure. I'm finished with low living, sight walking, small planning, smooth knees, colorless dreams, tame visions, mundane talking, cheap living, and dwarfed goals.
I no longer need pre-eminence, prosperity, position, promotions, plaudits, or popularity. I don't have to be right, first, tops, recognized, praised, regarded, or rewarded. I now live by faith, lean on His presence, walk by patience, lift by prayer, and labor by His power.
My face is set, my gait is fast, my goal is heaven, my road is narrow, my way is rough, my companions are few, my Guide reliable, my mission clear. I cannot be bought, compromised, detoured, lured away, turned back, deluded or delayed. I will not flinch in the face of sacrifice, hesitate in the presence of the adversary, negotiate at the table of the enemy, ponder at the pool of popularity, or meander in the maze of mediocrity.
I won't give up, shut up, let up, until I have stayed up, stored up, prayed up, paid up, preached up for the cause of Christ. I am a disciple of Jesus. I must go till He comes, give till I drop, preach till all know, and work till He stops me. And when He comes for His own, He will have no problem recognizing me - - my banner will be clear!!!
Written by a young African pastor: It was tacked on the wall of his house, and found after he died as a martyr for the Gospel!

Wednesday, December 22, 2010
Saturday, December 18, 2010
Stampin' Up! Filled with Love Promotion, Free Buttons!
Let's talk about love!
Stampin' Up! is always coming up with the BEST deals! I absolutely LOVE coordinating product and this set of patterned paper you can get with this new promotion is so great! Pink and red and hearts....tons of Valentine creating...can't wait!

 Click HERE to visit my online store and make your Filled with love purchase which includes Bitty Buttons for FREE!
Thanks for stopping by!
Kelly
Stampin' Up! is always coming up with the BEST deals! I absolutely LOVE coordinating product and this set of patterned paper you can get with this new promotion is so great! Pink and red and hearts....tons of Valentine creating...can't wait!
Thanks for stopping by!
Kelly
Monday, December 13, 2010
Shelli Gardner on the Today Show!
Shelli Gardner, CEO and co-founder of Stampin' Up! was on the TODAY SHOW today! Stampin' Up! has been participating in the Today Show's annual toy drive for about 6 years now. I completely agree with her that we all have a need to be creative and I love that her gifts for the toy drive encourage creativity!
Visit msnbc.com for breaking news, world news, and news about the economy
Friday, December 3, 2010
Brownie in a Jar with Stampin' Up! Deck the halls fabric
I've always wanted to make a these gifts in a jar and I learned of this website from another Stampin' Up! Demonstrator with great ideas. I made 4 of them in no time at all...well under an hour, but I didn't actually time myself. I really don't know who I'll be giving them to, but I'm down to only 3 to give away. I needed to make something sweet for Shawn's lunches and grabbing one of those jars seemed like an easy solution. And it was, and I don't feel one bit guilty for making myself a present. The brownies are delicious!
 Stamp Set: Deck the Halls (Holiday mini 2010)
Ink: Early Espresso
Paper: Deck the Halls Designer series patterned paper, Always Artichoke, Very Vanilla
Tools: 1 3/4 inch circle punch, Extra Large Fancy Label punch
The recipe is on the back of the tag. I printed off the recipe cards from straight from the website. Here's the link to the recipe: http://christmas.organizedhome.com/recipes/gifts-in-a-jar/sand-art-brownies
Let me know if you try them!
Kelly
TO PURCHASE STAMPIN' UP! ONLINE 24/7 CLICK HERE!
Tuesday, November 23, 2010
My Digital Studio Overview
Freda...this is for you!
Anyone else interested in knowing more about My Digital Studio? I'd love to talk to you. Here's a little video you can watch. And below it is a page I created with MDS.
Check out http://mydigitalstudio.net, create an account and start learning and sharing your creations!

Anyone else interested in knowing more about My Digital Studio? I'd love to talk to you. Here's a little video you can watch. And below it is a page I created with MDS.
Check out http://mydigitalstudio.net, create an account and start learning and sharing your creations!

Wednesday, November 17, 2010
Make your own Hot Cocoa Mix
This stuff is the bomb! I was REALLY surprised at how good it is. It's MUCH better than any of the packaged hot cocoa you can find. Here's the link to the original recipe I found: http://www.cdkitchen.com/recipes/recs/1061/Homemade-Hot-Cocoa-Mix76102.shtml
I made up a batch and created 11 serving sizes to give as gifts. I put the mix in Stampin' Up! small cello bags with a 1/4 cup of small marshmallows. The 12th serving was for me to sample. I wanted to make sure that I didn't need to add anything. I added 3 small pinches of salt which is different from the original recipe and I also used a rounded 1/4 cup of powder, not level. It doesn't need to be heaping, but I thought it was better with a couple of teaspoons more than a 1/4 of a cup. I tell you all this, because my recipe is slightly different from the one I found online. So here's MY version of the recipe...
Ingredients:
Directions:
In large mixing bowl combine all ingredients; stir carefully to blend well. Store in tightly covered container. Makes 12 servings.
Single serving: Combine a rounded 1/4 cup mix and 3/4 cup boiling water in cup or mug; stir to blend. Add marshmallows to hot cocoa, if desired.
Let me know if you like it!
Kelly
TO PURCHASE STAMPIN' UP! PRODUCTS ONLINE 24/7 CLICK HERE!
I made up a batch and created 11 serving sizes to give as gifts. I put the mix in Stampin' Up! small cello bags with a 1/4 cup of small marshmallows. The 12th serving was for me to sample. I wanted to make sure that I didn't need to add anything. I added 3 small pinches of salt which is different from the original recipe and I also used a rounded 1/4 cup of powder, not level. It doesn't need to be heaping, but I thought it was better with a couple of teaspoons more than a 1/4 of a cup. I tell you all this, because my recipe is slightly different from the one I found online. So here's MY version of the recipe...
Ingredients:
2 cups nonfat dry milk powder
1 rounded cup of powdered sugar
1/2 rounded cup Hershey's cocoa
1/2 rounded cup powdered non-dairy creamer
3 small pinches of kosher salt
1 rounded cup of powdered sugar
1/2 rounded cup Hershey's cocoa
1/2 rounded cup powdered non-dairy creamer
3 small pinches of kosher salt
Directions:
In large mixing bowl combine all ingredients; stir carefully to blend well. Store in tightly covered container. Makes 12 servings.
Single serving: Combine a rounded 1/4 cup mix and 3/4 cup boiling water in cup or mug; stir to blend. Add marshmallows to hot cocoa, if desired.
Let me know if you like it!
Kelly
TO PURCHASE STAMPIN' UP! PRODUCTS ONLINE 24/7 CLICK HERE!
Thursday, November 11, 2010
Somebody should have been here to provide intervention...
When I was a new demonstrator (less than 2 years ago), it would make me crazy to see cards like this that had every imaginable product used on one card...and now I've gone and done it. I apologize to you if you are new and it makes you crazy too! Believe me, not all of my cards have this much product on it.
I originally started making cards because I was a scrapbooker with TONS of product. I was already rubber stamping on my scrapbook pages and was really into all the different techniques you could do with rubber stamps and ink. Then I admitted to myself that I should not be buying cards when I had all of this stuff to make cards with, so I started making my cards as well. Happily working away at my hobby, I often looked at magazines for inspiration and instruction. In those magazines, I found myself drawn to a certain rubber stamp company that had the most beautiful ads and gorgeous stamps. That company was Stampin' Up! of course! I went online to find a demonstrator and called her. I told her I wanted to be able to buy at a discount, so lets sign me up as a demonstrator! A lot more happened in between that phone call and when I actually became a demonstrator, so I'll make a long story short. I actually was a hostess for about 2 years before I finally became a demonstrator. Now here I am happily creating paper crafts...and I get to teach others what I'm learning. It really is such an awesome job to have!!
Enough about me...here's my crazy card:
 Now here's the crazy list of products used:
Paper: Crumb Cake, Poppy Parade, Old Olive, More Mustard, Very Vanilla, Tempting Turquoise, Newsprint Designer Series Patterned Paper
Stamp Sets: Style Beautiful, Day of Gratitude, Belle Stampin around stampin wheel (2010 Holiday Mini)
Ink: Early Espresso, More Mustard, Tempting Turqoise
Tools: Big Shot, Scallop Oval Extra-large punch, Two-Step Bird Extra-Large punch, Swirls Scribbles Sizzlit die, Finial Press textured embossing folder, Itty Bitty Shapes punch pack, Scallop Edge Border punch, Flower layers with leaf die (retired)
Accessories: Smooch Pearlized Accent Ink Silver Fox, Shimmer Paint Champagne Mist, Stampin Sponges, Poppy Parade Ribbon, Vintage Brads, Floral Fusion Sizzlit die
Additional: Muslin fabric, Ranger Mini Mister
Thanks so much for taking a look! Hope you have time to get your fingers inked up today!
Kelly
TO PURCHASE STAMPIN' UP! PRODUCT ONLINE 24/7 CLICK HERE!
I originally started making cards because I was a scrapbooker with TONS of product. I was already rubber stamping on my scrapbook pages and was really into all the different techniques you could do with rubber stamps and ink. Then I admitted to myself that I should not be buying cards when I had all of this stuff to make cards with, so I started making my cards as well. Happily working away at my hobby, I often looked at magazines for inspiration and instruction. In those magazines, I found myself drawn to a certain rubber stamp company that had the most beautiful ads and gorgeous stamps. That company was Stampin' Up! of course! I went online to find a demonstrator and called her. I told her I wanted to be able to buy at a discount, so lets sign me up as a demonstrator! A lot more happened in between that phone call and when I actually became a demonstrator, so I'll make a long story short. I actually was a hostess for about 2 years before I finally became a demonstrator. Now here I am happily creating paper crafts...and I get to teach others what I'm learning. It really is such an awesome job to have!!
Enough about me...here's my crazy card:

Paper: Crumb Cake, Poppy Parade, Old Olive, More Mustard, Very Vanilla, Tempting Turquoise, Newsprint Designer Series Patterned Paper
Stamp Sets: Style Beautiful, Day of Gratitude, Belle Stampin around stampin wheel (2010 Holiday Mini)
Ink: Early Espresso, More Mustard, Tempting Turqoise
Tools: Big Shot, Scallop Oval Extra-large punch, Two-Step Bird Extra-Large punch, Swirls Scribbles Sizzlit die, Finial Press textured embossing folder, Itty Bitty Shapes punch pack, Scallop Edge Border punch, Flower layers with leaf die (retired)
Accessories: Smooch Pearlized Accent Ink Silver Fox, Shimmer Paint Champagne Mist, Stampin Sponges, Poppy Parade Ribbon, Vintage Brads, Floral Fusion Sizzlit die
Additional: Muslin fabric, Ranger Mini Mister
Thanks so much for taking a look! Hope you have time to get your fingers inked up today!
Kelly
TO PURCHASE STAMPIN' UP! PRODUCT ONLINE 24/7 CLICK HERE!
Wednesday, November 10, 2010
Stampin' Up! Delightful Decorations Christmas Card
I was scoping out another rubber stamp company and I saw a card that I could case! I think I might do more of that, it was really inspiring. I felt like I was experiencing all new stamping styles. Occasionally, I start to feel like I can't create anything new...but this feels new to me. I hope you like it!

 Here are the measurements for the card.
In the next photo you'll see I've stamped my images on a scratch piece of very vanilla. I will used the punches to punch them out. I also randomly stamped the dotted circles design from the Delightful Decorations Stamp set on my center piece of Crumb Cake. I don't know if you can see that in the photos of the card. I used Whisper White Craft ink only because I don't have any Very Vanilla Craft ink.

 Just in case no one ever told you to use your punch upside down to see what you're punching...now someone has. :-)
 To create those ink marks along the edges of the cardstock, I swiped the ink pad directly on the edge. Move your ink pad up and down the edge as you're swiping, because you really only get those "longer" marks from the corners of your ink pad. Keep the ink pad perpendicular to the paper so the marks also come out looking perpendicular as you can see in my sample.

 I inked the edges of all my pieces with Early Espresso ink. I just cut out the Happy Holidays by hand with paper snips.
 Piece it all together add some rhinestones and voila you're done with another Christmas card!
Thanks for stopping by to take a look!
I hope you get to spend some time with friends making cards soon! If you're in Sidney, call me, let's do a workshop soon!
Kelly
TO PURCHASE STAMPIN' UP! PRODUCT ONLINE 24/7 CLICK HERE!

Colors used are Crumb Cake, Wild Wasabi, Very Vanilla, Early Espresso, Real Red and Whisper White Craft ink. Stamp Sets used were Delightful Decorations and Four the Holidays. Accessories used were Stampin' Sponges, Basic Rhinestones, ornament punch and 3/4 circle punch.

In the next photo you'll see I've stamped my images on a scratch piece of very vanilla. I will used the punches to punch them out. I also randomly stamped the dotted circles design from the Delightful Decorations Stamp set on my center piece of Crumb Cake. I don't know if you can see that in the photos of the card. I used Whisper White Craft ink only because I don't have any Very Vanilla Craft ink.


Thanks for stopping by to take a look!
I hope you get to spend some time with friends making cards soon! If you're in Sidney, call me, let's do a workshop soon!
Kelly
TO PURCHASE STAMPIN' UP! PRODUCT ONLINE 24/7 CLICK HERE!
Monday, November 8, 2010
MOPS table decorations and door prize
I have the privilege this year of being doing hospitality in tandem with another Kelly for MOPS this year. She lets me do all the gift wrapping, which pleases me quite a bit. The door prizes are also part of the table decorations and this month I remembered to snap a photo of them before I whisked them out the door. (Yes, I completed them on the same morning they were needed...procrastinator? I would have to admit to that...but I prefer "working well under pressure"). A couple of them even got spritzed with champagne mist shimmer paint mixed with alcohol...I absolutely cannot resist that stuff!! Can you see it? That little bit of shimmer?
 What I've wrapped are yummy candles from Bath and Body that the other Kelly picked up...she does all the shopping...which also pleases me. These were so easy to do. I just stamped a strip of 2 x 7" piece of Very Vanilla cardstock with the Bright Blessings Stampin Around Wheel in Cajun Craze Classic ink. I used Sticky Strip to adhere the stamped paper to the candle so it would be sure to stay around the candle. I tied the bags with Pumpkin pie striped grograin ribbon. The tag is the greeting from Day of Gratitude set (2010 Holiday Mini) stamped in Cajun Craze on Very Vanilla, then punched with the Decorative Label punch (2010 Holiday Mini). I layered a pumpkin pie scalloped circle punch behind, punched a small hole and threaded the label with linen thread and added to the knot of pumpkin pie striped ribbon. Super easy and super cute. The ladies loved them.
Thanks for stopping by to take a look. Each of the products mentioned to should be linked to my online store..a lovely new feature for Stampin Up demonstrators who have a DBWS. (Demonstrator Business Website)
If you would like to start buying your Stampin' Up! supplies at a discount as well as earning FREE Stampin' Up! product, talk to me about becoming a demonstrator!
Have a wonderful day and do some stamping!
Kelly
TO PURCHASE STAMPIN' UP! PRODUCT ONLINE 24/7 CLICK HERE
Tuesday, October 26, 2010
Stampin' Up! Halloween Treat Bag Toppers with the Big Shot

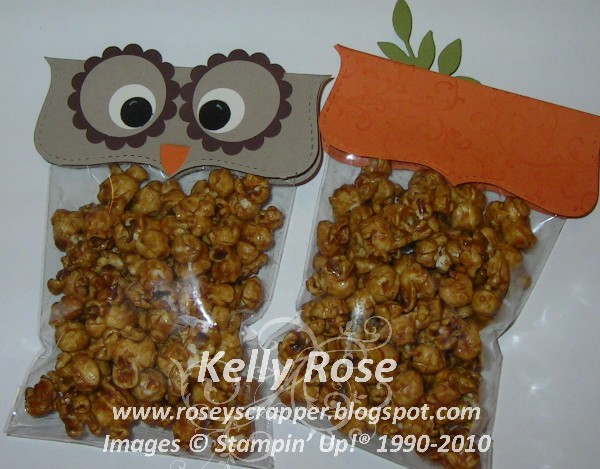


Big Shot (113439), Top Note Die (113463), Medium Flat Cello Bags (102757), Small Flat Cello bags (103104), 1" Circle punch, 3/4" circle punch, 1/2" circle punch, Owl punch, Stampin Write Black journaler, White uno ball gel pen, 1 3/8" circle punch, Scalloped circle punch, 5 petal flower punch
Cardstock: Old Olive, Basic Black, Whisper white, Crumb Cake, Chocolate Chip, Pumpkin Pie
Microwave Caramel Corn
This is a fabulous treat and so easy to make. Be careful because the caramel corn is extremely hot when it comes out of the microwave. You'll be tempted to taste it right away, but DON'T...wait till it has cooled. It's worth the wait.
The original recipe calls for 12 cups of popcorn and the caramel ingredients are doubled. If you're doing this in a large paper grocery sack, go ahead and double the recipe. If you're going to do it in a microwavable bowl with a lid, such as the Tupperware microwave cookery stuff, then use just 6 cups of corn and the recipe as it appears here.
The original recipe calls for 12 cups of popcorn and the caramel ingredients are doubled. If you're doing this in a large paper grocery sack, go ahead and double the recipe. If you're going to do it in a microwavable bowl with a lid, such as the Tupperware microwave cookery stuff, then use just 6 cups of corn and the recipe as it appears here.
Microwave Caramel Corn
Put in 1 qt. measuring cup, or in a large microwavable bowl with a microwavable lid (this is what I do):
½ c. brown sugar
¼ c. butter
2 Tablespoons white corn syrup
¼ teaspoon salt
¼ teaspoon baking soda
(All microwaves are slightly different and you may need to adjust your times appropriately) Microwave on HIGH and boil for 2-4 minutes. ( I do 1 minute, stir, 1 minute stir, 30 seconds remove) Pop 6 cups of corn. Spray non-stick cooking spray, such as PAM, in a large paper grocery sack. (I just use my Tupperware microwave bowl with lid that I cook the caramel in.) Put popped corn in bag (in bowl) and pour (stir) caramel mixture over it. Put in microwave on HIGH for 1 minute; shake; microwave 45 seconds; shake; microwave 30 seconds; shake; microwave 30 seconds; shake. Pour caramel corn onto a cookie sheet to cool. (I use a silicone liner in my cookie sheet, so there is no sticking) Stir while cooling so the pieces separate.
 More detail about these bags in this post here.
Thanks for looking!
Kelly
Thanks for looking!
Kelly
Thursday, September 23, 2010
Stampin' Up! Day of Gratitude
I fell in love with this set and this patterned paper as soon as I looked at the new Holiday Mini Catalog, yet I've not found myself using it very much. I'm glad I got it out yesterday and played with it. I love the richness of the Autumn Spice textured patterned paper! And Cajun Craze! Oh my! What a lovely fall color!
Do you like what I've done with the Day of Gratitude Set and Autumn Spice paper? Coordinating products sure make it easy, that's one of my biggest loves about Stampin' Up!

Here are the dimensions:
Card base in Early Espresso is the standard 8 1/2 x 5 1/2 folded in half and creased with a bone folder. The first layer of pattered paper is cut from one piece (it's striped on one side and has the leaf pattern on the other), 5 1/4 x 4 inches. Then I cut it at 1 1/2 and flipped one side over. All edges were inked with Early Espresso with a Stampin Sponge. The leaf stamp was stamped in the corner as seen with Cajun Craze classic ink. Another leaf was stamped onto a scratch piece of the same patterned paper and cut out.
The focal piece with the sentiment is a piece of very vanilla cut to 2 1/4 x 2 3/4 inches. The patterned paper under that was cut at 2 1/2 x 3 inches. The Cajun Craze layer under that was cut at 2 5/8 x 3 1/8. All edges were inked with Early Espresso using a Stampin Sponge.
The sentiment was stamped using Stampin Write markers in Cajun Craze and Early Espresso. I used Early Espresso taffeta ribbon layered with Chantilly Crochet Trim and tied around the focal piece. I used a large Antique Brad on top of the ribbon. I also used this layered ribbon and trim on top of the first layer of patterned paper at the seam.
I used the Dotted Scallop Ribbon Border punch to punch a piece of 4 inch Cajun Craze and then cut it in half and adhered the pieces just under the layered ribbon .
I adhered the layered focal piece with Stampin Dimensionals and the cut out leaf with Stampin Dimensionals.
Please let me know if you like it and if you have any questions by leaving a comment!
Till later!
Kelly
TO ORDER STAMPIN' UP! PRODUCTS ONLINE 24/7 CLICK HERE!

I didn't use the Big Shot, can you believe it?
Do you like what I've done with the Day of Gratitude Set and Autumn Spice paper? Coordinating products sure make it easy, that's one of my biggest loves about Stampin' Up!

Here are the dimensions:
Card base in Early Espresso is the standard 8 1/2 x 5 1/2 folded in half and creased with a bone folder. The first layer of pattered paper is cut from one piece (it's striped on one side and has the leaf pattern on the other), 5 1/4 x 4 inches. Then I cut it at 1 1/2 and flipped one side over. All edges were inked with Early Espresso with a Stampin Sponge. The leaf stamp was stamped in the corner as seen with Cajun Craze classic ink. Another leaf was stamped onto a scratch piece of the same patterned paper and cut out.
The focal piece with the sentiment is a piece of very vanilla cut to 2 1/4 x 2 3/4 inches. The patterned paper under that was cut at 2 1/2 x 3 inches. The Cajun Craze layer under that was cut at 2 5/8 x 3 1/8. All edges were inked with Early Espresso using a Stampin Sponge.
The sentiment was stamped using Stampin Write markers in Cajun Craze and Early Espresso. I used Early Espresso taffeta ribbon layered with Chantilly Crochet Trim and tied around the focal piece. I used a large Antique Brad on top of the ribbon. I also used this layered ribbon and trim on top of the first layer of patterned paper at the seam.
I used the Dotted Scallop Ribbon Border punch to punch a piece of 4 inch Cajun Craze and then cut it in half and adhered the pieces just under the layered ribbon .
I adhered the layered focal piece with Stampin Dimensionals and the cut out leaf with Stampin Dimensionals.
Please let me know if you like it and if you have any questions by leaving a comment!
Till later!
Kelly
TO ORDER STAMPIN' UP! PRODUCTS ONLINE 24/7 CLICK HERE!
Stamp Sets: Day of Gratitude (120835 or 121148)
Ink: Early Espresso (119670), Cajun Craze (119671)
Stampin Write Markers: Early Espresso(119680), Cajun Craze (119678)
Paper: Very Vanilla (101650), Early Espresso (119686), Cajun Craze (119684), Autumn Spice(120808)
Accessories: Dotted Scallop Ribbon Border punch (119275), Chantilly Crochet Trim (118480), Early Espresso Taffeta Ribbon (119964), Antique Brads (117273), Stampin Sponges (101610), I didn't use the Big Shot, can you believe it?
Tuesday, September 21, 2010
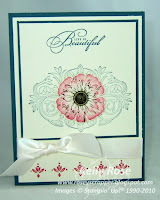
Stampin' Up! Day of Gratitude Card


Kelly
TO ORDER STAMPIN' UP! PRODUCTS ONLINE 24/7 CLICK HERE!
Ink: Poppy Parade (119782), Always Artichoke (105219), Daffodil Delight (119667), Early Espresso (119670), Versamark (102283)
Paper: Always Artichoke (105119), Daffodil Delight (119683), Poppy Parade (119793), Newsprint DSP (117166)
Accessories: Poppy Parade 1/2 " Poly Stitched Ribbon (119263), Lots of Tags Sizzlits Dies (114508), Big Shot (113439), Scalloped Circle Punch (119854), Spiral Border Punch (119872), Stampin Sponges (101610), Clear Stampin' Emboss Powder(109130), Powder Pals (102197), Heat Tool (100005), Embossing Buddy (103083), Cutter kit (106958)
NON Stampin' Up! Tools: Stapler
Sunday, September 19, 2010
Stampin Up Style Beautiful with Greenhouse Garden
This weeks Card of the Week was created combining two of my favorite stamp sets: Style Beautiful and Greenhouse Garden. And the technique used on the flower I found in the 2010-2011 Idea Book and Catalog on page 101. I've been drooling over that page for some time now and finally had an idea breakthrough. I love having that gorgeous Idea Book and Catalog as a reference for inspiration, don't you?
 Measurements and instructions:
Card base is standard 8 1/2 x 5 1/2 Not Quite Navy folded in half.
1st layer is 4 x 5 1/4 Very Vanilla, with the small medallion from Style Beautiful stamp set in Riding Hood Red Classic Ink. To this layer I also tied the Very Vanilla satin ribbon just above the line of stamped medallions.
Next layer is 3 3/4 x 3 3/4 Not Quite Navy.
On top of that is a layer of 3 5/8 x 3 5/8 Very Vanilla stamped with the sentiment and the largest medallion from Style Beautiful in Not Quite Navy Ink.
The flower was stamped on Very Vanilla cardstock. The 2 flower stamps were inked up with Riding Hood Red classic ink only on the edges with a sponge dauber. The top detail layer of the two step flower stamps were inked with Soft Suede and stamped on top of the Riding Hood Red layer. Then the flowers were cut out and layered on top of each other. The flower was finished with a decorative brad from the new Antique Brads, another one of our great new accessories. The layered flowers were set on top of the large medallion with stampin dimensionals.
Thanks so much for stopping by!
Kelly
TO ORDER STAMPIN UP PRODUCT ONLINE 24/7 CLICK HERE
 Stamp Sets: Style Beautiful (116984 or 120483) and Greenhouse Garden (113824)
Ink: Not Quite Navy classic ink(103008), Riding Hood Red classic ink (111836), Soft Suede classic ink (115657)
Paper: Not Quite Navy (100867), Very Vanilla (101650)
Accessories: Very Vanilla Satin Ribbon (117291), Antique Brads (117273), Stampin Dimensionals (104430)
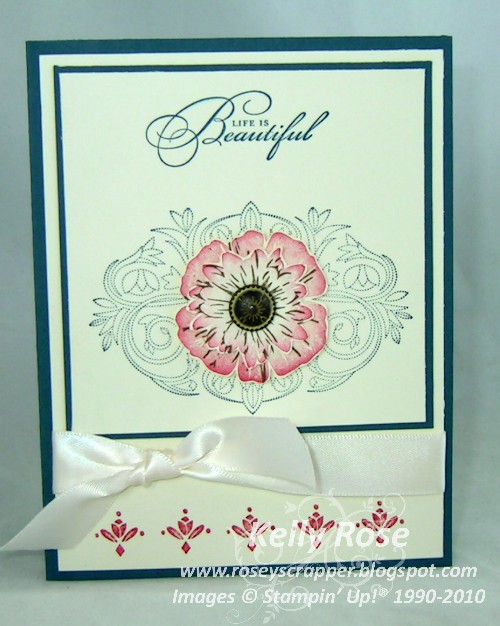
Card base is standard 8 1/2 x 5 1/2 Not Quite Navy folded in half.
1st layer is 4 x 5 1/4 Very Vanilla, with the small medallion from Style Beautiful stamp set in Riding Hood Red Classic Ink. To this layer I also tied the Very Vanilla satin ribbon just above the line of stamped medallions.
Next layer is 3 3/4 x 3 3/4 Not Quite Navy.
On top of that is a layer of 3 5/8 x 3 5/8 Very Vanilla stamped with the sentiment and the largest medallion from Style Beautiful in Not Quite Navy Ink.
The flower was stamped on Very Vanilla cardstock. The 2 flower stamps were inked up with Riding Hood Red classic ink only on the edges with a sponge dauber. The top detail layer of the two step flower stamps were inked with Soft Suede and stamped on top of the Riding Hood Red layer. Then the flowers were cut out and layered on top of each other. The flower was finished with a decorative brad from the new Antique Brads, another one of our great new accessories. The layered flowers were set on top of the large medallion with stampin dimensionals.
Thanks so much for stopping by!
Kelly
TO ORDER STAMPIN UP PRODUCT ONLINE 24/7 CLICK HERE
Ink: Not Quite Navy classic ink(103008), Riding Hood Red classic ink (111836), Soft Suede classic ink (115657)
Paper: Not Quite Navy (100867), Very Vanilla (101650)
Accessories: Very Vanilla Satin Ribbon (117291), Antique Brads (117273), Stampin Dimensionals (104430)
Thursday, September 16, 2010
A little Wordplay
I wanted to make a card with some bling...and pink of course! These new packs of basic rhinestones and the basic pearls are AWESOME! And a great value too! You get 150 Basic Rhinestones for only $4.95. And they are self adhesive which make them so easy to use. I love what a little pearl or rhinestone does for a project. It's often that "little something" that makes your project really shine! If you don't have some yet, you really should get some soon!
 Thanks for taking a look!
Kelly
TO PURCHASE STAMPIN' UP! PRODUCTS ONLINE 24/7, CLICK HERE
 Stamp Set: Wordplay (120308 or 120651)
Punches: 3/4" Circle Medium (119873), 1/2" Circle Small (119869), Itty Bitty Shapes Punch Pack (118309)
Paper: Whisper White (100730), Cherry Cobbler (119685), Regal Rose (105130), Pink Pirouette (111351)
Ink: Basic Black (101179)
Accessories: Basic Rhinestones (119246)

Kelly
TO PURCHASE STAMPIN' UP! PRODUCTS ONLINE 24/7, CLICK HERE
Punches: 3/4" Circle Medium (119873), 1/2" Circle Small (119869), Itty Bitty Shapes Punch Pack (118309)
Paper: Whisper White (100730), Cherry Cobbler (119685), Regal Rose (105130), Pink Pirouette (111351)
Ink: Basic Black (101179)
Accessories: Basic Rhinestones (119246)
Like me on Facebook for my "Pick of the Day"
Hey Stampers!
I've started posting a "Pick of the Day" link on my facebook page! I hope you'll "Like" me so you can see my picks. I've started posting links to amazing cards and projects that I find while I'm web surfing (is that term still used?). Join my facebook page HERE and click "Like" to get my daily picks. And I would LOVE it if you left me "likes" and comments! Perhaps you'll find YOUR card or project on my page someday! I hope so, and wouldn't mind being directed there if you have something you're particularly proud of! I won't be posting my picks to my blog...you'll have to join me on facebook to see them.
Happy Stamping!
Kelly
UPDATED on 01/19/11: I would still love for you to "like" me on Facebook, but I feel I must be honest in telling you that I seem to be adding my own creations more than my Pick of the Day finds. I will still find other fabulous cards and post them on my Facebook page, but perhaps not quite as often. Kelly
Tuesday, September 14, 2010
Stampin' Up! Card Mini Album
Oh my goodness! I think this is just TOO adorable. We're going to be doing this tonight at Stamp Club! I hope the ladies like it, cuz it's a little more than we usually do. I just couldn't resist!!
 Here are the inside pages...


 This little gem actually fits inside an envelope! You could add photos or poems, a letter written on all pages, or inspirational quotes and scripture.
I cased this from another Stampin' Up! Demonstrator who posted a photo of her original album on Stampin Connection..a website just for demonstrators. The link to her original is here. You'll see I copied her's pretty closely. Hope you enjoy! Please leave a comment if you do!
Here's a link to a Google Doc with instructions.
Blessings,
Kelly
TO ORDER STAMPIN' UP! PRODUCTS, 24/7 ONLINE, CLICK HERE!

Stamp Sets: Vintage Vogue (117690, or 118598), En Francais (109521), Whimsical Words (retired, Sale a bration set 2010)
Paper: Early Espresso(119686), Blushing Bride (119796), Very Vanilla (101650), Patterns Designer Series Paper Stack, Neutrals (117157), Old Olive (100702)
Ink: Early Espresso (119670), Blushing Bride(119786), Old Olive (102277)
Additional: Two-Step Bird Extra-Large punch (117191), Scallop Trim Border (118402), Trio Flower punch (retired), Sticky Strip (104294), Glue Dots (103683), Multipurpose liquid glue (110755), SNAIL adhesive (104332), Big Shot (113439), Movers and Shapers Die (114506), Beautiful Wings Embosslit Die (118138), Metallic Eyelets (105319), Crop-A-Dile (108362), Stampin Sponges (101610), Early Espresso Taffeta Ribbon (119964), Basic Pearls (119247)
Monday, September 13, 2010
Big Shot Class
Free Class with a minimum $25 Stampin Up! product purchase. (My downline demonstrators may attend for $5) Come make a card, a scrapbook page and a sewn coaster. All projects will be made using the Big Shot and accessories. We'll be using only a few accessories so you can see how versatile the Big Shot accessories can be for all your crafting! This photo does not do the projects justice! They are vibrant, full of texture and details. I know you'll love them. Please RSVP by Friday, September 17th, 2010. Class is in Sidney at Karousel Kids from 10am to 12pm. Snacks will be served. Please bring your own adhesive. A paper trimmer, scissors and bone folder would also be great to have with you.
 These coasters would make wonderful holiday gifts for teachers, friends, co-workers and family. You won't believe how easy they are to make! I'm also going to share a secret of how to use Big Shot embossing folders to emboss a 12 inch border for your scrapbook page. You can't see it in the photo, but that purple strip on the scrapbooking page is embossed with polka dots using a 5 1/2 inch long embossing folder! I'll also show you how to create a faux button with punches.
Hope to hear from you soon! In the meantime...Happy Stamping!
Kelly
TO ORDER STAMPIN' UP! PRODUCTS ONLINE, 24/7, CLICK HERE!


Hope to hear from you soon! In the meantime...Happy Stamping!
Kelly
TO ORDER STAMPIN' UP! PRODUCTS ONLINE, 24/7, CLICK HERE!

Big Shot Die-Cutting Machine (113439), Scallop Square Bigz Clear Die (115950), Scallop Circle #2 (113469), Perfect Polka Dots Textured Impressions Embossing Folder (117335), Flower Folds Bigz XL die (115970), Mini Glue Dots (103683)
Additional Products Used on the scrapbook page: Dotted Scallop Ribbon Border punch (119275), Photo Corners Extra-large (119878), 1" Circle Punch (119868), Word Play Stamp Set (120308, or 120651), Poppy Parade Classic Ink (119782), In Color 12x12 assortment (119799)(used Poppy Parade and Pear Pizzazz), Elegant Eggplant 12x12 (119927), Elegant Eggplant Classic Ink (105210), Whisper White 8 1/2 x 11 (100730)
Additional Products used on the Card: Three Little Words Stamp Set (113254), Word Window Large (119857), Brights Designer Buttons (119747)
Wednesday, August 11, 2010
Faux Bleach Alcohol Ink Technique
It's been a really long time since I've played with my alcohol inks, so when todays Splitcoaststampers Weekly Inkling was on alcohol inks, I couldn't resist playing along.
Here's the link to the technique on that site: http://www.splitcoaststampers.com/resources/tutorials/fauxbleachalcohol/
And here are my cards using that technique.


Here's the link to the technique on that site: http://www.splitcoaststampers.com/resources/tutorials/fauxbleachalcohol/
And here are my cards using that technique.


The stamp sets used from top to bottom were:
Countryside (#116998), and Woodgrain (#117100)
Herb Expressions (#113224)
Watercolor Trio (#117050) - - which is only available until August 31, 2010, from the Summer Mini Catalog
Paper used:
Cajun Craze, More Mustard, Basic Black, Watercolor paper, Glossy White
Elegant Eggplant, Basic Gray, Whisper White, Glossy White
Baja Breeze, Pear Pizazz, Whisper White, Glossy White
Please let me know if you have any questions!
Till later,
Kelly
He who pursues righteousness and love, finds life, prosperity and honor.
Proverbs 21:21 NIV
Saturday, July 10, 2010
Card of the Week, July 11, 2010
Quite a beauty, wouldn't you say? I hope this inspires you to do some burnishing...or use the Awash with Flowers stamp set...or do some dry embossing...or just do any kind of stamping at all! That's what's most important!

This card was cased. Leave me a comment if you know who I cased it from!!
I stamped Awash with Flowers images on Whisper white cardstock and with a sponge dauber and ink, I rubbed in a circular motion on the images. I used multiple color inks on all the images. For the large petal flowers, I used Regal Rose and Rose Red. The tulipy looking flowers are pumpkin pie and rose red. The leaves are Certainly celery and Daffodil Delight. Daffodil delight was also used to burnish the background. I used a Stampin Sponge to add basic black around the edges. Paper used was Regal Rose, Certainly Celery, Basic Black, Pumpkin Pie and Whisper white. Accessories used: Medium jewelry tag punch, Scallop Trim Border punch. Additional Stamp set used: Tiny tags.
Artist Tip: When burnishing, always "stamp off" your sponge dauber before applying ink to your project so you don't get a "blob" of color when you first start burnishing. This technique may require some practice, so get out some scratch paper if you're trying it for the first time.
Demo tip: I think this would be a good one to demonstrate, but not so sure on the Make-N-Take-ability of it. I fear first timers would not be happy with the results.
Your comments are appreciated!
If you haven't done so already, please sign up for my Free Email Card of the Week Newsletter.
Till later,
Kelly
Style Beautiful Inspired By Heidi Swapp
I was surfing Heidi Swapp's blog yesterday and saw a scrapbook page that instantly spoke to me! (The post of her's is found here.)It was fresh and summery with a vintage flare and inspired me to use some of my new stash from the new catalog. The Newsprint (#117166) designer series paper is going to be SO FUN to use this year. And I must say that one of my very favorite additions to the catalog this year is the Patterns Designer Series PAPER STACK (#'s 117158, 117155, 117152, 117154 and 117157)! It's a stack of 40 sheets in double-sided designs in 10 colors. One for all the color families. I started with the subtles collection (#117152) and I think I'll get the Brights collection next. Wish I could get them all at once, but I can't. Boo hoo.
And those Paper Daisies! How fun are those going to be? And a great price, too! (# 119243, $6.95)
Do you LOVE this card? I do. I'm really loving it. Really.

 Punched leaves.
 Direct ink to flower application.
 Paint with aqua painter to blend.

And those Paper Daisies! How fun are those going to be? And a great price, too! (# 119243, $6.95)
Do you LOVE this card? I do. I'm really loving it. Really.

Ingredients:
Stamp sets: Style Beautiful (# ), Elements of Style (# )
Ink: Basic Black (#101179), More Mustard (#103162), Marina Mist (#119668)
Paper: Marina Mist (#119682), Patterns Designer Series Paper Stack (#117152), Newsprint (#117166), Whisper White (#100730), So Saffron (#105118), Crumb Cake (#120953)
Accessories: Paper Daisies (#119243), Basic Pearls (#119247), Aqua Painter (#103954), Mini glue dots (#103683), Paper Snips (#103579), 1 3/8 inch circle punch (#119860), Spiral border (#119872), Stampin Sponges (#101610), Snail adhesive (#104332)
Card base is 8 1/2 x 5 1/2 inch piece of Crumb Cake. Use your bone folder to crease. Cut a piece of the polka dot marina mist patterned paper to 4 x 5 1/4 inches, sponge the edges with More Mustard ink. Cut a piece of the ledger paper from the Newsprint pack to 4 x 3 1/4 inches, punch the top with the spiral border punch, crumple slightly and sponge all over with More Mustard ink. Stamp the flower image from Elements of Style stamp set in Marina Mist ink on Whisper white paper and cut out the image with paper snips (a must have for detailed cutting). Stamp the larger flourish image from Style Beautiful stamp set in More Mustard ink on So Saffron paper and immediately use the aqua painter to paint the lines of the image. This gives an aged look to the image. Cut out with paper snips and sponge the edges in More Mustard. Punch out a circle then punch a portion of the circle off as shown in the photo below to make two leaves. Crumple and sponge the edges in More Mustard. Stamp the flourish from Style Beautiful in Marina Mist on Whisper White paper and then stamp again so the images face each other as shown, creating a larger medallion type image. Stamp the sentiment in the middle using Basic Black ink.
To create the flowers, ink the them with More Mustard ink as shown then use the aqua painter to blend. Add more ink if necessary and blend again till you get the desired depth of color. Assemble the card as shown. Use glue dots to adhere the leaves and flowers.
 Punched leaves.
 Paint with aqua painter to blend.
Please sign up for my Free Card of the Week E-Mail Newsletter!
Thanks for looking and please leave me a comment if you enjoyed this card!
Till later,
Kelly
Tuesday, July 6, 2010
Circle Circus in Pumpkin Pie
I love to see people use stamp sets and colors in unexpected ways. Here's one I tried that I found unexpected when I finished.


Stamp sets: Circle Circus(#115778), Tiny Tags(#118091). Ink: Pumpkin Pie(#105216). Paper: Very Vanilla(#101650), Island Oasis (Summer Mini 2010 #117173). Accessories: Linen Thread(#104199), Jumbo Eyelets, Striped Grosgrain ribbon(#115616), Tag punch(#117190), 3/4 inch circle punch(#119873), Paper Piercing Tool(#116631).
Stamp top half of 5 1/2 x 8 1/2 very vanilla card base that has been folded and creased with a bone folder. Trim a piece of the polka dot paper from the Island Oasis paper pack to 5 1/2 x 2. Layer onto card front below stamped portion. Wrap enough ribbon around the card to go through the jumbo eyelet as shown. I glued this all in place with sticky strip before trying to poke the points of the eyelet through the card. Stamp a piece of scrap very vanilla with the same circle image and punch out with the 3/4 inch circle punch. Apply adhesive and glue in position so it will show through the jumbo eyelet. Press the prongs through the card, but not through the back of the ribbon. Press the prongs down and then add a little adhesive under the ribbon to keep it in place over the prongs on the inside of the card. Stamp the sentiment and flourish from Tiny Tags stamp set and punch out with tag punch. Use paper piercing tool to add hole on the tag. Run a piece of linen thread through the tags and tie them around the ribbon as shown. Use snail adhesive to position the tags in place.
Shop anytime for these terrific Stampin' Up! products in my online store.
Thanks for taking a look and please leave me a comment! And don't forget to...
Sign up for your FREE E-mail with an inspirational Card of the Week. Always free and your e-mail is never sold or given away.
Stop by again soon! In the meantime, happy stampin'!
Kelly
Friday, July 2, 2010
Sign up for a Card of the Week Inspiration E-Mail
Sign up today for your Free Card of the Week Inspiration E-Mail. Get a short e-mail every week with an inspirational card to keep your creative juices flowing. All cards will be simple enough for you to duplicate exactly or re-create with your flair. They will also come complete with instructions.
I hope you'll sign up today! Click on the page link above to sign up. It's absolutely FREE and I NEVER share my e-mail list.

Stamp the large flower from the stamp set, Tropical Party in Tempting Turquoise. Stamp the small flower 3 times with So Saffron Ink. Cut out all four flowers with your Paper Snips (#103579). Fold a piece of 8 1/2 x 5 1/2 inch So Saffron cardstock in half and crease with your bone folder (#102300). Trim a piece of the Old Olive patterned paper from the Island Oasis designer series patterned paper pack to 5 1/2 x 1 1/2 inches. Trim the lattice patterned paper to 3/4 x 5 1/2 inches. Use your snail adhesive (#104332) to adhere the two pieces together so that 1/2 inch of the lattice paper shows above the old olive pattern. Audition (put it in place without adhering) the patterned paper on the card front so you can see where to start stamping the palm fronds. Stamp in Old Olive ink the palm fronds as shown. Layer the flowers together and insert the Old Olive brads. Adhere the patterned papers to the bottom of the card front as shown. Use Stampin' Dimensionals (#104430) to adhere the flowers to the card as shown. Stamp the saying in Tempting Turquoise ink as shown and tie the twill tape around the card as shown. Tie with a square knot and trim the ends.
Now send this to a strong woman in your life whom you love and appreciate. She'll appreciate your thoughtfulness and the time you took to make her a special card.
Till later,
Kelly
Thanks for stopping by and don't forget to sign up for your FREE Inspirational Card of the Week E-Mail!!
I hope you'll sign up today! Click on the page link above to sign up. It's absolutely FREE and I NEVER share my e-mail list.

Ingredients:
Stamp sets: Favorite Sayings (#120048)
Tropical Party (#120081) Both found in the summer mini catalog, 2010
Ink: Old Olive (#102277), Tempting Turquoise (#100814)
Paper: So Saffron (#), Island Oasis (#117173), Very Vanilla (#101650)
Accessories: 3/8 inch Twill Tape (#119970), Brights Brads (#119740) Stamp the large flower from the stamp set, Tropical Party in Tempting Turquoise. Stamp the small flower 3 times with So Saffron Ink. Cut out all four flowers with your Paper Snips (#103579). Fold a piece of 8 1/2 x 5 1/2 inch So Saffron cardstock in half and crease with your bone folder (#102300). Trim a piece of the Old Olive patterned paper from the Island Oasis designer series patterned paper pack to 5 1/2 x 1 1/2 inches. Trim the lattice patterned paper to 3/4 x 5 1/2 inches. Use your snail adhesive (#104332) to adhere the two pieces together so that 1/2 inch of the lattice paper shows above the old olive pattern. Audition (put it in place without adhering) the patterned paper on the card front so you can see where to start stamping the palm fronds. Stamp in Old Olive ink the palm fronds as shown. Layer the flowers together and insert the Old Olive brads. Adhere the patterned papers to the bottom of the card front as shown. Use Stampin' Dimensionals (#104430) to adhere the flowers to the card as shown. Stamp the saying in Tempting Turquoise ink as shown and tie the twill tape around the card as shown. Tie with a square knot and trim the ends.
Now send this to a strong woman in your life whom you love and appreciate. She'll appreciate your thoughtfulness and the time you took to make her a special card.
Till later,
Kelly
Thanks for stopping by and don't forget to sign up for your FREE Inspirational Card of the Week E-Mail!!
Subscribe to:
Posts (Atom)
LinkWithin
