Thursday, January 27, 2011

Another Burpee Catalog inspired Stampin' Up! Build a Blossom card

 This card was inspired by the gorgeous Phantom Petunia in the Burpee seed catalog.  Isn't it beautiful?
The card's not bad either, is it? (grin)

Have I inspired anyone else to look at their seed catalogs for inpsiration?
 My card was done on an Elegant Eggplant card stock base.  The patterned paper is from the Subtles Patterned Designer Series Paper Stack.  This is an amazing pack of patterned papers!  I love to add a little pattern to my project without veering away from my intended color scheme.  And I love the way the patterns lend themselves to the Victorian feel of this card.

The flower was done by punching out 5 of the large petals from Very Vanilla card stock with the Blossom Petals punch from the Occasions Mini Catalog.  I then stamped the petal image on each punched petal in So Saffron classic ink.  Then I used my elegant eggplant marker to color the sides of each petal right up to the edge of the stamped image.  I intensified the color by layering the marker coloring 3 times.  Then with an aqua painter, I painted along the edge of the stamped image on the colored elegant eggplant area.  This softens the edge of the marker lines and even lightens the color a bit.
I also colored the edge of a clear plastic ruler and touched down in the center of each petal to create that faint purple line you see down the center.  I folded the petals in half, creased and un-folded which adds to the life-like dimension of the flower, but is difficult to see in the photo.
I punched the large flower from the Boho Blossoms punch in Elegant Eggplant.  I glued the petals to this flower then added the Build a Brad brad that I made with the flower center stamp from the Build a Blossom Stamp set and a 1/2 inch circle punch of Elegant Eggplant. I put this brad through the center of the flower.  Then I took a second large flower punched with Boho Blossoms punch and glued to the back.  I mounted the flower on the card with Stampin Dimensionals.  I added a few Stampin' Dimensionals under some of the petals for more stability.
The Trim added to the card is Victoria Crochet Trim.

The tag was first stamped with the friends sentiment from the Tiny Tags Stamp set in Elegant Eggplant on Very Vanilla paper.  I then stamped the flourish on top of the sentiment in So Saffron.  I punched the sentiment out with the Medium Jewelry Tag punch and a small Elegant Eggplant flower from the Itty Bitty Punch Pack.  I glued these together, used my paper-piercer to make a hole in the tag and threaded it with linen thread.  I tied this around the knot in the crochet trim already added to the card. I then added the Basic pearls to the tag and to the top right corner of the card.  To line up the large pearls in the corner I used the Mat Pack paper-piercing template. (That's a tool I am so glad I have! It's fast becoming one of my top ten!)

All of the products on this card are from Stampin' Up!  Please let me know if you would like to place an order, or you may do so by clicking the link below.  Want it all?  Talk to me about becoming a demonstrator!

Thanks for stopping by! I'd love to hear from you! And come back soon!  To be notified by e-mail of my blog posts, you can subscribe to this blog on the right.

Happy Stamping!
Kelly

Wednesday, January 26, 2011

Sweet Heart Cup Valentine with a Ruffled Ribbon

One of my customers requested a tutorial on how to put together a Sweet Heart Cup Card.  I was happy to oblige!

Card base is Whisper White 5 1/2 x 8 1/2, folded in half.  Also cut in WW a 3 x 3 inch piece and a 5 x 3 3/4 inch piece.
You will also need the following:
Real Red card stock: 5 1/8 x 3 7/8 inches
Basic Black card stock:  3 1/8 x 3 1/8 inches
Real Red polka dot paper from Brights Patterns Designer Series Paper Stack:  2 1/2 x 2 1/2 inches
 Punch the 3 x 3 whisper white piece by putting it all the way down into the punch and center it.
Put the cup inside the punched heart opening you just made. Fill the treat cup and remove the adhesive backing.
 Apply the polka dot piece over the heart cup.  Apply a thin layer of Mono Adhesive around the edge of the Whisper White back.
 Holding the cup and steadying the card edge adhere to Basic Black piece.
 Apply Sticky Strip around the outside of the heart starting in the cleavage as shown above.
 Fray at least 1/2 inch of Real Red Satin ribbon.
 Find a fiber in the middle of the fray to start pulling.  As you pull the fiber, the ribbon will gather.  Just continue to pull that same fiber out and push and gather the ribbon until you get the length you need. This fiber is really strong, you do not need to be gentle, just patient, as this process can take a little bit of time. (Keep measuring it around the heart cup.  Make sure you have at least 1 inch extra length of gathered ribbon.
Trim one end of the ribbon. Remove the red adhesive backing from the Sticky Strip and adhere the gathered ribbon around the heart cup.  I began adding the ribbon to the spot on the heart where I knew I wanted to add a bow.
Trim the second end of the gathered ribbon where the ends meet, so you have a nice finished look.
I tied the bow separately and adhered it with a mini glue dot.  Finish stamping and layering the card as shown in the sample, or anyway you want.  Ink used is Real Red, Pretty in Pink, and Staz On Jet Black.  Stamp Sets used are I {heart} hearts, Perfect Punches, and Filled With Love.  Punches used were Full Heart Extra Large, 1 3/8 x 5/8 Oval Large, Scallop Oval Extra-Large, Heart small, and 2 x 1 3/8 Oval Extra-Large.
Thanks so much for stopping by!
Kelly

A Burpee Catalog inspired Stampin' Up! Build a Blossom Card

It's time to start dreaming about the garden, making plans and ordering seed.  I found this incredible flower in the Burpee seed catalog and immediately thought about how I could "re-create" this beauty out of paper.  There are several others in the catalog I have ideas for that I hope to show you soon as well.  What a fun place for inspiration!
Here's a photo I found on the web of the Dahlia, Showtime I found in the Burpee catalog...
And here's my inspired card...

 For the tiny scalloped edge, I punched out strips of Daffodil Delight card stock using the Dotted Scallop Ribbon border punch and cut them in half as shown.  Then I carefully lined up the strips on my grid paper so that I could overlap the scallops in the corner so the notches or valley of the scallops on each strip met.   I then put a thin line of Mono adhesive down two edges of my Crumb Cake card stock (3 3/4 x 5 inches) and laid it on top of the lined up scallop strips.
 Working quickly before the glue has a chance to dry, push back the corner and cut the two strips as shown.  If you took care to line up the scallops as described above you should be able to start your cut right in the valley of those two overlapping scallops.  This is how you create a mitered corner and can be done with straight strips of paper as well.
 I cut out 3 of the medium daisy's from the Flower, Daisies #2 die.  To get the random look of the natural flower petals, I lifted and twisted each petal first I twisted to right, and the next petal I twisted to the left. Continue alternating the direction of the twist all the way around the daisy. Pinch and crumple slightly as you twist.  After all three have been twisted, glue then together making sure you offset the petals slightly at each layer and line up the center circle.
For the very center, I cut 5 of the smallest daisy from the same die and using a bone folder and my thumb, I bent and curled the petals up and inward then glued them all together.  Again, be careful to stagger the petals and line up the center circles as you glue.
For the center beaded part of the flower, I punched a 1" circle and added Crystal Effects till it was entirely covered. I then sprinkled tiny little beads on the Crystal Effects and pressed slightly to adhere.  Let this dry completely.
The large Tangerine Tango petals were stamped in Tangerine Tango using the Build a Blossom Stamp set and punched out with the Blossom Petals Punch.  I used the same thumb and bone folder technique to break the fibers of each petal and bend back slightly.

Finish the card by stamping the fabulous friend greeting from the Oval All stamp set in Staz On jet black ink on Crumb Cake, Tangerine Tango and Daffodil Delight card stock.  Punch out the image from Crumb Cake using the large oval punch. Use the Tangerine Tango and Daffodil Delight images to cut out the large flower and flower center respectively to paper piece on top of the Crumb Cake image. Punch out a scalloped oval from Daffodil Delight and layer as shown.  Stamp and punch the leaves using Pear Pizzazz ink and paper. Add all elements to a Crumb Cake card base.
Thank you so much for taking a look!
Kelly
TO ORDER STAMPIN' UP! SUPPLIES ONLINE 24/7 CLICK HERE!
CHECK OUT MY ONLINE ORDERING REWARDS PROGRAM HERE!
A SALE-A-BRATION IS GOING ON NOW! FIND OUT HOW TO GET FREE STAMPS HERE!!
Subscribe to Kelly Rose, Independent Stampin' Up! Demonstrator by Email

Friday, January 21, 2011

Stampin' Up! Eat Chocolate Petal Cone Treat Bag

Isn't this so adorable!!!  I actually squealed when I saw the original (by Michelle P.) on stampinconnection (a website for Stampin' Up! Demonstrators).  I had to make one right away and I can't believe how quickly it came together.  I'm in a hurry to get to Bible study on time so I won't post a lot of details, but would be happy to answer any questions you might have!

Stamp Set:  Eat Chocolate
Ink: Chocolate Chip
Paper:  Very Vanilla, Real Red
Tools: Decorative Label Punch, Big Shot, Petal Cone Die
Accessories:  Stampin' Sponges, Stampin' Dimensionals, 1/4" Chocolate Chip grosgrain ribbon, hole punch, Mono Adhesive


Here's another Petal Cone I made...just for kicks!
The colors in this are Melon Mambo, Pretty in Pink, and Whisper White.
Till later, Happy Stamping!
Kelly

Kelly's Quick Links:

TO ORDER STAMPIN' UP! SUPPLIES ONLINE 24/7 CLICK HERE!


LIKE ME ON FACEBOOK AND JOIN THE DAILY FUN!


CHECK OUT MY NEW ONLINE ORDERING REWARDS PROGRAM!

Thursday, January 20, 2011

Introducing my new Online Ordering Rewards Program

I am so pleased to announce my new Online Ordering Rewards Program!  Click here to download the complete program details.

Earn 10 ROSES for each online $50 product purchase and then choose a FREE stamp set of your choice (any price) as my gift to you for being my loyal Stampin' Up! customer.

You can earn ROSES with local orders, workshop orders and club orders as well!

Please let me know if you have any questions about my new Online Ordering Rewards Program!

Happy Stamping!
Kelly
TO ORDER STAMPIN' UP! SUPPLIES ONLINE 24/7 CLICK HERE!

Filled With Love...a Lovely Stampin' Up! Promotion!

Here's a reminder that the Filled with Love promotion ends on Monday, January 24, 2011.  Place your order with me for either the wood or clear mount bundle and get a FREE Bitty Buttons pack.  AND, if you place your order with me for either bundle you may order a Pretty in Pink or Real Red classic stampin' pad for 1/2 price!  I want you to be able to make beautiful coordinating projects that you'll be proud to give to those you LOVE, so I'm not stopping there!! You can also order a pack of Whisper White card stock with your bundle for 15% off!


Take the price of your preferred bundle...
Clear mount ( $26.90 ) or Wood ( $32.90 )

Add $ 2.98 for a stamp pad in Pretty in Pink or Real Red

Add $ 7.23 for a 15% off Whisper White card stock pack of 40 sheets

For an amazing deal still under $50

Please call or e-mail me to take advantage of this special offer. (kelly (at) time2scrapbook (dot) com)  I cannot offer discounts with on-line ordering. Prices do not include shipping/handling or tax and is for US customers only.
 Here are some card ideas using the Filled with Love bundle...
 For this first card I used the popping pastels technique.
 This second card has a heart window and the front panel with the heart punch window is mounted with stampin' dimensionals.
 This third card has a scallop circle from the Scallop Circles #2 die.
And on this last card I used the Scalloped Heart of Hearts embosslit.  
My favorite is a toss up between this last one and the one that is all Pretty in Pink...I'm a sucker for pink.  Which one is your favorite?  Seriously, I'd love to know!
I didn't put a lot of "how to" details on this post, so if you have any questions about anything you see here, please contact me!
Happy Stamping!
Kelly

Tuesday, January 18, 2011

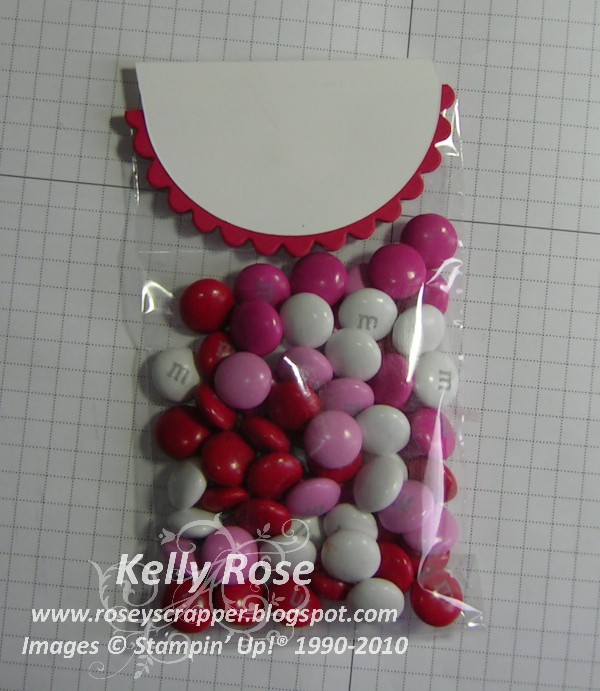
Valentine Treat Bag with Petal Cone cuts

I thought I'd better bag up the Valentine M&M's before there weren't anymore left!  So I got out my small cello bags and gave it some thought...Here's what happened...
 To get the scalloped topper, I took a piece of 3 1/4 x 4 inch real red card stock and folded it in half with my bone folder.  I laid the fold right up next to the cut line of the scallop on the die and taped it in place on the new Bigz Petal Cone die from the new Occasions Mini Catalog 2011. (Download by clicking the catalog on the right hand side of the screen)

Then I add a scrap piece of Whisper White card stock to the half circle portion (petal) of the petal cone die and taped it in place.
Run these through the Big Shot sandwiched between the acrylic plates.
 And you'll end up with these two pieces.
 Staple the scallop you created over the top of the bag.
 Use your snail adhesive to adhere the white petal to the front of the bag.
 From the back of the bag, trim the extra white card stock close to the edge of the topper.  Your paper snips are great for this job!
Stamp the trio of hearts on whisper white card stock in real red ink and punch out using the heart to heart punch. 


In the photo above I have one in Melon Mambo and Real Red.  Aren't they adorable?  And they were SO easy to make.  Hope you get to try one for yourself! Here's a printable tutorial for your use.
I'm going to have to come back later for all the details of the product...bedtime for the little one!
Updated 01/19/11 with product information below.
Happy Stamping!
Kelly
TO ORDER STAMPIN' UP! SUPPLIES ONLINE 24/7 CLICK HERE!
Stamp Set: I {Heart} Hearts (#117010 wood or #118292 clearmount)
Ink:  Melon Mambo (#115656), Real Red (#103133)
Paper:  Melon Mambo (#115320), Real Red (#102482)
Tools:  Big Shot (#113439), Bigz Petal Cone die (#121810 from the Occasions Mini 2011), Heart to Heart punch (#119881)
Accessories:  small cello bags, pkg. of 50 (#103104)

LinkWithin

Related Posts Plugin for WordPress, Blogger...